Keep your Wireguard up
2019-05-05 · IoT 4G Raspberry Pi
After writing my previous post on 4G dongle hosting I felt pretty pleased with myself. I reckoned I gave a fairly nice overview on the subject. At work I brazenly proclaimed “This is how it is done!” and waited for the standing ovation. Alas, no applause. The adoration was denied by the phrase “Why didn’t you use Wireguard?”.
Wireguard? The name seemed vaguely familiar but I didn’t remember what it was. “It’s way faster than OpenVPN” the barrage continued. I was stumped. OpenVPN was the way I had always done VPN things in the past. A quick Ducking around revealed that, indeed, Wireguard made way more sense in this application. Hence, in this post we shall delve into video streams over Wireguard VPN.
Unlike OpenVPN which lives in the user-space, Wireguard is a kernel-space VPN software. It has a way smaller code base and even the praise of Linus. The Wireguard site has tons of information on the project.
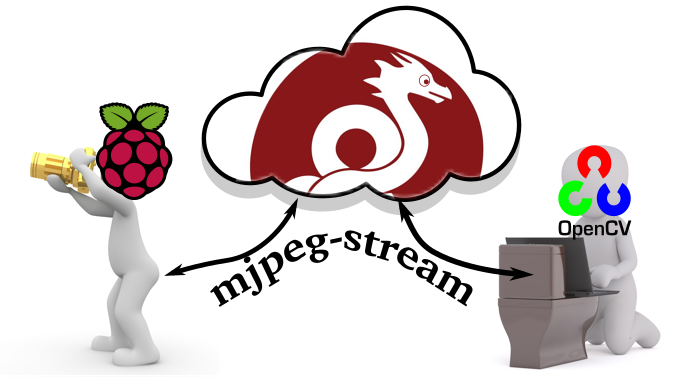
So the goal is to set up a video stream coming from a usb camera connected to an RPi which can be accessed by OpenCV. So basically we need to create a Wireguard VPN (or a “private cloud”) which the RPi and the OpenCV machine can connect to (as illustrated in the banner image). And all of this should work regardless of how the devices access the internet. I’ll use a similar setup as in the last post of having a Debian server at Linode and using that as the Wireguard central node.
Setting up a Wireguard server on a Debian box is just a matter of adding the unstable source to the source list and install using apt. On the RPi I installed Wireguard from source. It took took only a couple of minutes to compile which was a nice surprise.
I followed the instructions on the Altispeed portal regarding the configuration. I also modified the /etc/sysctl.conf file to allow the clients on the VPN to talk to each other. To allow both clients access I added one peer entry for RPi and one for the OpenCV with different IP addresses. Like this:
[Interface]
Address = 10.100.100.1/24
SaveConfig = true
PostUp = iptables -A FORWARD -i %i -j ACCEPT; iptables -A FORWARD -o %i -j ACCEPT; iptables -t nat -A POSTROUTING -o eth0 -j MASQUERADE
PostDown = iptables -D FORWARD -i %i -j ACCEPT; iptables -D FORWARD -o %i -j ACCEPT; iptables -t nat -D POSTROUTING -o eth0 -j MASQUERADE
ListenPort = 51820
PrivateKey = <<SERVER-PRIVATE-KEY>>

[Peer]
PublicKey = <<OPENCV-COMPUTER-PUB-KEY>>
AllowedIPs = 10.100.100.2/32

[Peer]
PublicKey = <<RASPI-PUB-KEY>>
AllowedIPs = 10.100.100.3/32
On the clients the configuration files were equally simple:
[Interface]
Address = 10.100.100.2/32  #This needs to match the IP on the server peer conf
PrivateKey = <<CLIENT-PRIVATE-KEY>>

[Peer]
PublicKey = <<SERVER-PUB-KEY>>
Endpoint = <<SERVER-IP-ADDRESS>>:51820
AllowedIPs = 0.0.0.0/0
PersistentKeepalive = 21
PRO-TIP: Make sure the interfaces are down if you fiddle with conf files since the changes will be overwritten otherwise
Once configured I used wg-quick to bring up the VPN interfaces. For the streaming part I’m using jacksonliam’s mjpeg-streamer fork. Just follow the installation instructions to get it up and running. To start the stream (at 1024x768 resolution and 30 fps) I ran:
mjpg_streamer -i "input_uvc.so -d /dev/video0 -r 1024x768 -f 30" -o "output_http.so -p 9090"
To quantify the delay, I used the “record stopwatch on desktop” - approach. Basically, we run a stopwatch that spits out timestamps and display that next to a video stream of itself. We can also record the computer screen (aka old-people-print-screen) to make comparison of the difference easier. I used a simple python script to view the stream and ffmpeg to record the screen.
For the stopwatch part, I decided to write it in in Rust (because why not). It was a nice opportunity to try out the Cursive - TUI framework. The stopwatch is pretty much a copy of the logs.rs example. You can find it and the python OpenCV viewer here.
First I got a baseline on my local network (RPi connected via LAN and OpenCV computer connected over 5 GHz WiFi). The delay was between 120 and 150 ms.

Then I switched to Wireguard and also changed my computer over to 4G connection. So basically then video stream went from my network to the VPS in Germany and I connected to that server over a 4G connection on my laptop.
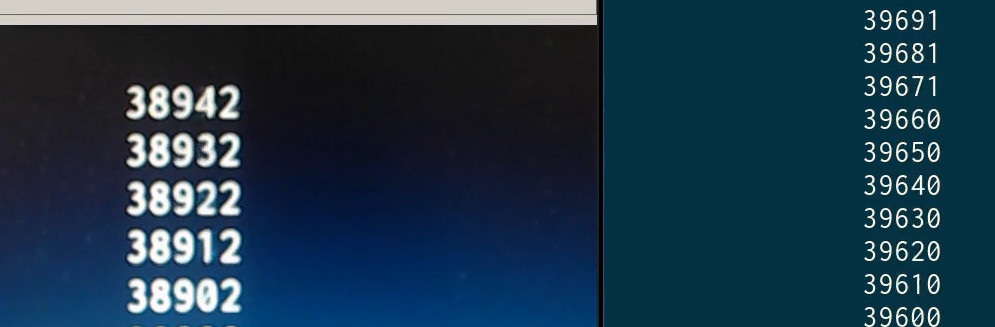
As the image shows the delay was around 800 ms. Not bad.
related posts
- Telegram emoji display 2020-08-17
- 4G-dongle hosting 2019-04-21
- ESP32 and OpenCV 2019-04-07