Right now you might be thinking that there is a typo in the title. It looks like some GPT-3 generated tech gobbledygook. But I assure you, it is not. In this post, I’ll go through my adventure in 3D printing QR encoded Arduino firmware slabs. For the pragmatically inclined, there is no utility in any of this. Apart from satiating an appetite for unsolicited technology mash-ups.
The spark to delve into this came from wanting to make a gift with the source code attached to the gift itself somehow (in a readable format). While it would have been easy enough to push the code onto some repo-hosting service or even upload it to some file sharing site, I didn’t want to rely on any external (online) service for storing this. Furthermore, it needed to be something non-obvious (the gift-receiver in question would not have appreciated barbaric approaches, such as memory sticks or printing the source code on paper). This needed to be unnecessarily complicated (as always). After considering RFID tags for a fleeting moment, I figured QR codes are more widely supported and malleable.
When making 3D printed QR code slabs, there are two factors at play; character count and feature size of the model. We want to minimize the character count in the actual firmware in order to attain large feature sizes on a volumetrically smallish print. Let’s start with firmware.
Firmware
Stuffing inappropriate content on QR codes is nothing new. There are, for example, youtube videos demonstrating how to put entire apps or games on QR codes. I am not sure who started this genre, but the MattKC video seems to be the most popular entry at the time of writing this. So if you can fit an entire game, surely fitting firmware source code is no issue.
QR codes can hold up to 3 kilobytes of data (4269 alphanumeric characters). That would be more than plenty. Since we are, however, planning to 3D print this thing we need to try keep feature size relatively large. That means we want to stick with QR Code version 4 or lower. So we need to get a bit creative with the source 🏌️
The source code we need to fit on the firmware is that of a programmable vim-clutch (USB keyboard pedal).
Essentially, this means a single button keyboard. Given that we want to minimize character count, we are better off using something heavily abstracted.
Luckily, there is no shortage of arduino keyboard options.
I figured I’ll keep the source somewhat readable while making it fairly concise.
Replacing void setup() and void loop() with an int main() and while(1) gets you most of the way.
I’m sure there are ways of golfing this even further but this was small enough so I went with it.
#include "HID-Project.h"
int main(){pinMode(7,INPUT);Keyboard.begin();while(1){if(!digitalRead(7)){Keyboard.write(KEY_ESC);}}}
Model
After confirming that the firmware worked I used qrencode to generate an svg.
I did not go too wild with optimizing the geometry here and just used the output directly.
qrencode -t SVG -r main.ino -o out.svg
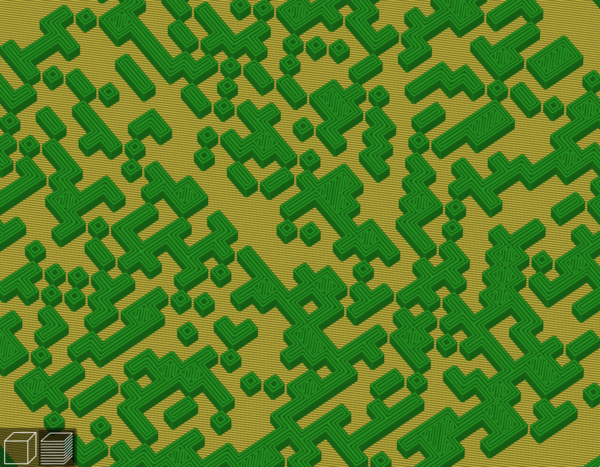
Then I coerced this into a 3D model with FreeCad and ended up with something like this:
There are of course plenty of online generators for making qr code stls directly. See e.g. here or here. When printing these you can either make the dark parts protrude or make them absent of material (intrude ? 🤷). Most online 3D QR code generators seem to go with the former as default. I went with that too since i was using dark filament and planning on filling the base with white acrylic filler anyway.
We are working with a QR code version 4 which means we have 33 by 33 unit squares. If we wanted to print e.g. a 40 by 40 mm slab with this format it would leave us with roughly 1.2 by 1.2 mm squares. I did all the printing on Ender 3 v2 equipped with a 0.2 mm extruder nozzle (and the same extrusion width). In a slicer this looks pretty ambitious but still doable.
Printing
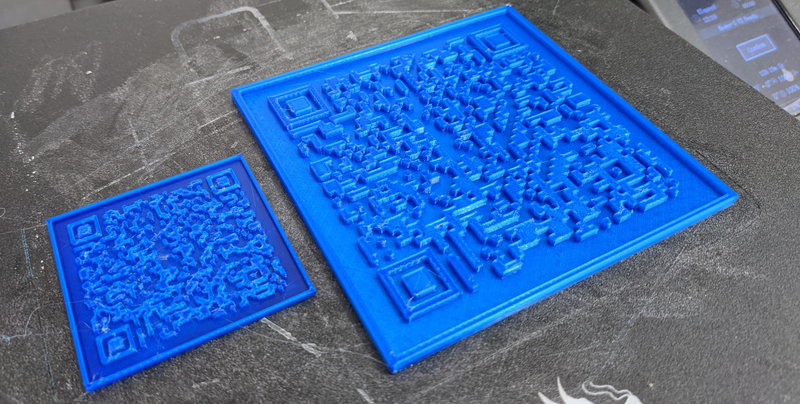
To hedge my bets, I printed two models, the original (40 mm by 40 mm) and then one twice the size (80 mm by 80 mm). Getting proper adhesion is more difficult with smaller nozzle sizes. A past self might’ve gotten a kick of such finagling but current self did not. Once you do get the offsets dialed in though, the first layer looks smooth going on 🧈.
The result for the 40 mm variant was less than ideal and not really salvageable. There was a lot of stringing and other defects on the surface (I’m sure there is a specific term all of these artifacts but I don’t know them). Luckily, the larger print looked great. Given all the headaches involved with printing with small nozzle orifices, I would recommend sticking to 0.4 mm for anyone interested in trying this.
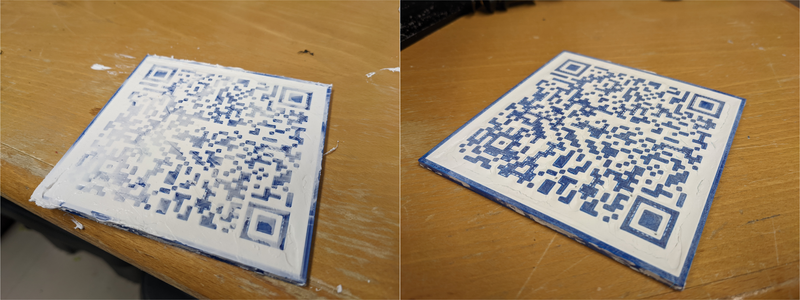
I proceeded to apply so acrylic filler on to the print. Once dry, I sanded the surface to expose the pattern.
Results
Phone QR code scanners are less than ideal for testing these sort a slabs. I found zbarcam to be far nicer to use.
Closing thoughts
When I first embarked on this adventure, I had lofty goals. For example, I was very interested in optimizing the geometry (for printability) in the QR code / firmware writing phase. I wanted to see if it would have been possible to optimize the perimeters by e.g. using different variable names etc. There would’ve also been plenty of demo scene shenanigans that could have possibly been transferred to this domain. Using something like Crinkler?
Nonetheless, I squandered most of my enthusiasm units on fighting with the small nozzle orifices. In retrospect, I should’ve made the exploration of parameter space less painful to be able to go deeper. With all tinkering necessary, the process was slow to iterate and maintaining excitement was difficult.
Looking at the prints, I believe the printing gods would have treated me more favorably if I had spent a bit longer on figuring out the parameters. More tuning is required to achieve good results with such small nozzle orifices. I’m convinced that the 40 by 40 mm is completely possible with a 0.2 mm with proper parameters and filament.
I might return to this topic in the future. I feel like there is way more to explore here. There are any funky ways to make 3D-QR-Codes using for example directional Light1. Such approaches are far more exciting that plain old planar slabs.
P.S. While writing this i realized that I should have made the pedal print its own firmware source code after e.g. a quintuplicate press. That would have been cool(er) 😎